Zeroes and Ones
Data Binding in Angular
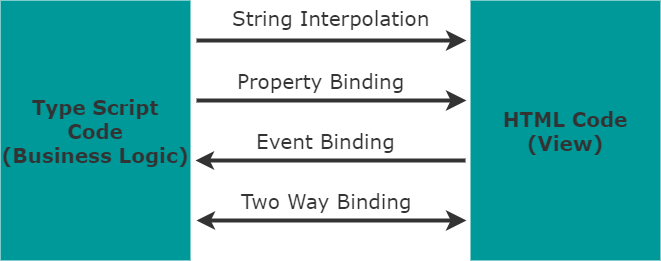
What is Data-Binding? The concept seems difficult, but in reality is quite straightforward. In Angular context, data-binding is the communication between two pieces of code in the component: The TS file where the business logic lives, and the template (html). Sometimes we want to define something in the class and display it in the template dynamically, other times the user might click on a button or type something on a search bar, and we might want to trigger something in our code to react to that. For all of this, we need the event bindings.
In general we have four ways of doing this. As output, or from the TS file to the template we have two wazys, one is string interpolation and the other one is property binding. For reacting to some user interaction in the template (an event) we use event binding. Finally we have one that does both, and is appropriately named two-way data binding
String Interpolation
String interpolation is pretty straightforward. We add some properties in our class:
export class ServerComponent {
  serverID: number = 10;
  serverStatus: string = 'offline';
}
And later we have access to them in the template via curly braces:
<p>The server with id {{serverID}} is {{serverStatus}}</p>
Inside the curly braces you can also add any expression that resolves into a string, so you can use a method call or use a ternary operator without any issues.
Example:
export class ServerComponent {
  serverID: number = 10;
  serverStatus: string = 'offline';
   getServerStatus() {
      return this.serverStatus;
  }
}
// In The template
<p>The server with id {{ serverID }} is {{ getServerStatus() }}</p>
Property Binding
Square brackets indicate to Angular that we are doing property binding. Property binding is the perfect ally when our mission is to set dynamically an attribute on a html element.
Here we are using it to set whether the button is disabled or not, based on a property (allowNewServers) defined in the class:
<button class="btn btn-primary" [disabled]="!allowNewServers">
  Add Server
</button>
Above we can set an attribute of the html element based on a property defined in the TS file (allowNewServers is boolean stored as a property). String interpolation and property binding are the two moments when we are communicating something from our TS file to the template.
Event Binding
Now we know how to send data from the TS file to our template, but how about the other way around? How do we receive information from an interaction that the user has done? Let's look at an example:
<button
  class="btn btn-primary"
  [disabled]="!allowNewServers"
  (click)="onCreateServer()">
  Add Server
</button>
<p>{{ serverCreationStatus }}</p>
First thing to notice is that event bindings are defined using parentheses. Here click, which is the name of the event, just like onClick in Javascript, is wrapped with the parentheses. To the right of it we have "onCreateServer()" which is a method defined in the TS file. So when a user clicks the button, that method is going to be fired up. As a side note, prefixing with on is a good practice when the user is the agent that initiates the action.
Now how about we want to not only run a method but send some data relative to the event? Good, let's take a look at this:
<label>Server Name</label>
<input
  type="text"
  class="form-control"
  (input)="onUpdateServerName($event)">
<button
  class="btn btn-primary"
  [disabled]="!allowNewServers"
  (click)="onCreateServer()">
  Add Server
</button>
<p>{{ serverCreationStatus }}</p>
The dollar sign event is a reserved word that gives us access to the event data (the object). On the TS file I can add this:
onUpdateServerName(event: any) {
  // This shows me all the info passed
  console.log(event);
}
Above we have a method on the TS file that expects the event and performs something with it, in this case, the quite uninteresting task of logging it. But logging it is not that interesting, let's do something else. We can take whatever the user enters in the input and then save that value in the application to later display back in the template like so:
serverName = ""
onUpdateServerName(event: any) {
  this.serverName: (<HTMLInputElement>event.target).value
}
And we show it in the template:
<p>Server Name:</p>
<p>{{serverName}}</p>
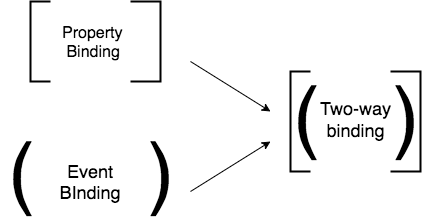
So we used event binding to fire a method (in input) for every key entered by the user. In our TS file we used that event information to update the value of the serverName property and later, which was later used in the template, via string interpolation, to showcase the value. Pretty neat not? But let me tell you there is an easier and straight forward way of combining event bindings and string interpolations. Enter two-way binding.
Two-Way Binding
In order to use two-way data binding we need to do something first. That is, enable the ngModel directive. What is a directive? No need to care just yet, I will talk about it on a later post, for now we just need to go to the app.module file, and similarly as we registered our components in order to use them, we import the forms module like this: import { FormsModule } from '@angular/forms'; and then just add FormsModule to the imports[] array and voila now we can use it.
<input
  type="text"
  class="form-control"
  [(ngModel)]="serverName">
And it's that simple. We assign to [(ngModel)] a name. This name is a property defined in our TS file. This means that for each letter we type in the input, our property value will be updated (we are binding the event), but if we change the property value on the TS file, it will also be reflected on the template output. That is why it is called a two-way data binding.
So there you go, that is pretty much it regarding property binding in Angular, stay tuned for the next blog post as I continue this learning journey with this awesome course by Max Schwarzmüller.